Battle of Villers-Bocage
The leading elements advanced eastwards from the town on the Caen road to a ridge at Point 213, where they were ambushed by Tiger I tanks of the 101st SS Heavy Panzer Battalion.The "single-handed" attack by Wittmann early on has excited imaginations, to the extent that some historians and writers conclude that it has dominated the historical record to an unwarranted degree and that while "remarkable", his role has been exaggerated.On 9 June, the Allied ground forces commander, General Bernard Montgomery, revised Operation Perch to be a bigger attack with a pincer movement to surround the city.[8] To the west of Caen, XXX Corps was unable to advance south of the village of Tilly-sur-Seulles against the Panzer-Lehr Division, one of the most powerful armoured formations in the German army, which had recently arrived in Normandy.[24] Soon afterwards, the 8th King's Royal Irish Hussars, the divisional reconnaissance regiment, began to reconnoitre a route for the brigade and the rest of the division left Trungy at around 16:00.[66][68] At 08:30, having covered 5 mi (8.0 km), the 22nd Armoured Brigade group entered the town to be greeted by celebrating residents; two German soldiers were spotted leaving at high speed in a Volkswagen Kübelwagen.Wittmann's Tiger was spotted at about 09:00 by Sergeant O'Connor of the Rifle Brigade, who was travelling towards Point 213 in a half-track and broke radio silence to give the only warning the British force received.[99] Major Werncke of the Panzer-Lehr Division conducted a reconnaissance of Point 213 later in the morning and reconnoitring on foot, discovered a column of unoccupied Cromwell tanks.At the east end of Villers-Bocage, he found a scene of "burning tanks and Bren-gun carriers and dead Tommies" and drove back to the Panzer-Lehr headquarters at Château d'Orbois.[110] A few men escaped; Captain Christopher Milner of the Rifle Brigade spent the rest of the day on the run and crossed back into the British lines after dark.[112][j] Kauffmann ordered Hauptmann Helmut Ritgen to block the northern exits of the town with 15 Panzer IV, mainly from 6th Company, 2nd Battalion Panzer-Lehr Regiment 130 and ten from a workshop south of Route Nationale 175.A Sherman Firefly, several Cromwells, a 6-pounder anti-tank gun and infantry of the 1/7th Queen's with PIATs waited for German tanks to move down the main street.[m] This figure includes five riflemen who had been captured but were then shot by their guards, apparently for attempting to escape, when they took cover spontaneously in a ditch under American artillery fire.[167] During the night of 14/15 June, to cover the withdrawal of the 22nd Armoured Brigade group, 337 Royal Air Force (RAF) bombers (223 Avro Lancasters, 100 Handley Page Halifax and 14 de Havilland Mosquitos from No.8 Group RAF) dropped 1,700 long tons (1,700 t) of high explosives on the town of Évrecy and on targets around Villers-Bocage, destroying one Tiger tank and damaging three more.[170] After being severely damaged by the fighting of 13 June and subsequent bombing raids, the town was liberated by a patrol of the 1st Battalion Dorset Regiment, 50th (Northumbrian) Infantry Division, on 4 August 1944.[179][181] Wittmann recorded a radio message on the evening of 13 June, describing the battle and claiming that later counter-attacks had destroyed a British armoured regiment and an infantry battalion.[79] Doctored images were produced; three joined-together photographs, published in the German armed forces magazine Signal, gave a false impression of the scale of destruction in the town.[183] In 2007, Stephen Badsey wrote that Wittmann's engagement of the spearhead of the 22nd Armoured Brigade group had overshadowed the period between D-Day and 13 June in historical accounts.[56][185][186] Hubert Meyer attributed the failure of Operation Perch to Wittmann's "courage, his tactical and technical abilities and [...] the valor, the expertise and the camaraderie of his Panzer crew".[188] John Buckley attributed the hyperbole about Wittmann to the lingering influence of the German propaganda campaign and criticised D'Este and Meyer for exaggerating his role and implying that he single-handedly stopped the 7th Armoured Division.Buckley wrote that Russell A Hart's claim that Wittmann "all but annihilated" the 7th Armoured Division spearhead was wrong and that "the complete German propaganda treatment" was available from Gary Simpson.[184] In 2013, Buckley wrote that unquestioning regurgitation of Nazi propaganda by writers and historians was inexcusably casual, when a glance at the facts showed that the defeat of the 7th Armoured Division by one Tiger crew led by Wittmann was a myth.Wittmann made a bold attack, which helped to stop the advance of the 4th CLY but did not make a solo effort; the action at Point 213 was led by Rolf Möbius.[190] Beevor and Patrick Delaforce have written that the ambush would have been mitigated had it been detected sooner and blame "Erskine's failure to provide [a] reconnaissance screen" ahead of the British vanguard as it moved to Point 213.[191][192] Marie wrote that the British vanguard out-paced the rest of the Brigade group, whose flanks were well protected and advanced with poor information and little intelligence gathering.Milner of the Rifle Brigade wrote that information was not gleaned from the town's inhabitants when it should have been, and that had the battalion scout platoon been present, the result of the first engagement may have been different."[197]Marie noted that Dempsey was disappointed in the lack of tactical flair shown by Brigadier Hinde throughout the battle and that the British should have known better than to attempt an armoured advance unsupported by infantry in the bocage.[210] Hastings was critical of a British failure to concentrate force at the crucial place and time, and referred to the feelings of the "men on the spot" in Villers-Bocage that "a single extra infantry brigade could have been decisive in turning the scale".[212] After the ambush by the 2nd Company, 101st SS Heavy Panzer Battalion and the loss of Point 213, the 22nd Armoured Brigade group had repulsed every German attack for two days, Erskine's troops had suffered no defeat after the first costly encounters with the single Tiger.Students of the battle have looked to the senior commanders involved to explain the "fumbled failure" at Villers-Bocage.
Allied and Axis dispositions on 12 June 1944, showing the British flanking attack through the Caumont Gap and the supporting US 1st Infantry Division advance
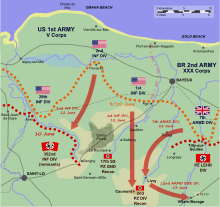
During the night of 9/10 June, the German 352nd Infantry Division retired towards Saint-Lô, creating a wide gap in the German lines covered only by light forces. On 12 June the British 7th Armoured Division passed through the gap heading for Villers-Bocage and the ridge beyond, while the US 1st and 2nd Infantry Divisions launched their own attacks in support.
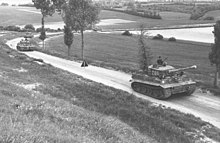
Wittmann's company, 7
June 1944, on
Route nationale
316, en route to
Morgny
. Wittmann is standing in the turret of Tiger 205.
[
41
]


Topography of the area west of Caen

The wreckage of the 1st Rifle Brigade transport column and a 6-pounder anti-tank gun, on the road between Villers-Bocage and Point 213

Major Well's Sherman OP tank, on the main street in Villers-Bocage
[
92
]
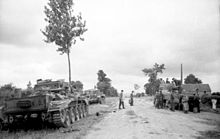
Destroyed British tanks on Point 213 after the German arrival, with two Cromwells on the left and a Sherman Firefly on the right

Knocked out German tanks on the main street of Villers-Bocage. Historian Henri Marie claims that the Tiger in the foreground was finished off by British infantry using grenades; none of the crew survived the attack.
[
128
]
The devastation was only partially caused by the battle; at first light on 14 June RAF
Hawker Typhoons
attacked the town hours before this photograph was taken.
[
120
]

Artist's impression for the
London Illustrated News
of the Tiger being engaged though the corner window by Bramall's Sherman Firefly. The artist has drawn the Firefly as a
Covenanter tank

The town of
Villers-Bocage
, photographed during the bombing raid on 30 June 1944. Six
Avro Lancasters
are visible.

Bill Cotton (on the left wearing a looted
Iron Cross
) and his tank crew

German tank commander Michael Wittman, photographed one month prior to Operation Overlord

A knocked out Panzer IV in Villers-Bocage

A knocked out Cromwell tank in Villers-Bocage
Operation PerchVillers-BocageUnited KingdomGermanyGeorge ErskineWilliam HindeFritz BayerleinHeinz von Westernhagenbrigade groupheavy tank battalionOperation OverlordAtlantic WallBodyguardFortitudeZeppelinTitanicTaxable, Glimmer & Big DrumCombined Bomber OffensivePointblankTransport PlanPostage AbleTarbrushFabiusCaen canal and Orne river bridgesMerville BatteryMallardAmerican SectorAlbanyBostonChicagoDetroitElmiraNormandy landingsPointe du HocGambitPort-en-BessinAmericanOperation ChastityBritishMulberryBrécourt ManorGraignesLa Haye-du-PuitsSaint-LôCarentanHill 30CherbourgBrévilleLe Mesnil-PatryNormandy massacresArdenne AbbeyDouvresMartletWindsorCharnwoodJupiter2nd OdonAtlanticGoodwoodVerrières RidgeSpringBluecoatTotalizeHill 140LüttichTractableHill 262ChamboisFalaiseSaint-MaloMantes-GassicourtLa RochelleUshantLa CainePierres NoiresAudierne BayJedburghDingsonSamwestCooneyBulbasketHoundsworthLoytonKiplingDragoonWallace & HardyCemeteriesSecond World WarWestern AlliesGerman-occupied FranceNormandy campaignSecond Army1st US Infantry Division352nd Infantry DivisionPanzer-Lehr Division22nd Armoured BrigadeWilliam "Loony" Hinde7th Armoured Divisionflanking manoeuvreTiger I101st SS Heavy Panzer BattalionObersturmführerMichael WittmannsalientBattle for CaenRAF Bomber Commandattritional battleInvasion of Normandy3rd Infantry DivisionI Corpscame ashoreSword Beach27th Armoured Brigade21st Panzer DivisionBernard Montgomerypincer movementOrne River51st (Highland) Infantry DivisionXXX CorpsTilly-sur-SeullesLieutenant-GeneralMiles DempseyFirst US ArmyKampfgruppenLXXXIV KorpsTrévières